Recipe

Thanksgiving | (Part 2) Pumpkin Pie Cheesecake

| Holidays, Recipe

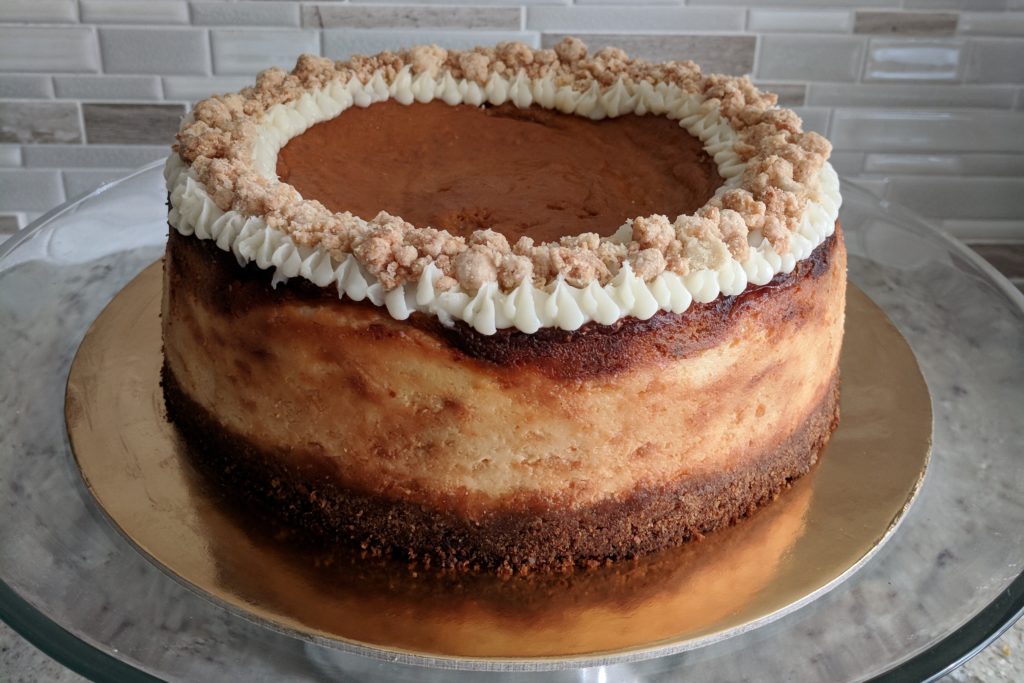
I was asked if it would be possible to make a dessert with a graham cracker crust, pumpkin cheesecake and pumpkin pie on top. Why yes, I don’t see why not! It was an experiment for sure, but here’s what I came up with:

Graham cracker crust + pumpkin swirl cheesecake + pumpkin pie + cream cheese frosting with pie crumbs

In the future, I think I would first pre-bake the cheesecake layer halfway using the standard bain-marie method to help it set in an even layer, and then add the pumpkin pie filling and completing the bake. I would also have the two layers at the same temperature before baking. As you can see, the cheesecake layer rose on the edges. I had chilled the cheesecake filling first before adding the pumpkin pie filling on top, to help prevent intermixing of the two layers. However, as this dessert baked, this contributed to a big temperature differential due to the edges of the cheesecake being in contact with the pan. The chilling probably works fine if this dessert were baked in a pie crust, which would create a buffer on the sides. In my version, the cheesecake is in direct contact with the pan. That execution issue aside, I’m told this still tasted great!

Recipe below, if you’d like to give it a try!

Pumpkin Pie Cheesecake

For 8-9″ cake/pie

Graham Cracker Crust

  • 100 g (1½ cups) graham cracker crumbs
  • 20 g (¼ cup) milk powder
  • 25 g (2 Tbsp) granulated sugar
  • 3 g (¾ tsp) kosher salt
  • 55 g (4 Tbsp) unsalted butter, melted
  • 55 g (¼ cup) heavy cream

Pumpkin Swirl Cheesecake Filling

  • 180 g granulated sugar
  • 670 g cream cheese
  • 70 g sour cream
  • 4 eggs
  • 120 g (½ cup) heavy cream
  • 1 tsp vanilla extract
  • 1 cup canned pumpkin puree
  • 50 g (¼ cup) granulated sugar
  • 1 tsp ground cinnamon
  • ¼ tsp ground nutmeg
  • pinch of ground cloves

Pumpkin Pie Filling

  • 150 g (¾ cup) sugar
  • ¼ tsp salt
  • 1 tsp ground ginger
  • 1 tsp ground cinnamon
  • ½ tsp ground nutmeg
  • ¼ tsp ground allspice
  • 15 oz. can pumpkin puree
  • 1 cup evaporated milk
  • 3 large eggs, lightly beaten

1. For graham crust: Toss or whisk together dry ingredients. Whisk together the melted butter and heavy cream. Add to the dry ingredients and toss to distribute evenly. The mixture should hold its shape when squeezed in your hand. Press into the bottom of a buttered springform pan (8″ or 9″).

2. For pumpkin swirl cheesecake: Using a paddle attachment and stand mixer, cream sugar and cream cheese until smooth, scraping bowl and paddle well. Add sour cream, and then eggs one at a time on slow speed. Add heavy cream and vanilla, mixing just to incorporate. Remove 1½ cups and pour remaining mixture into prepared pan.

3. Stir pumpkin, ¼ sugar and spices into the 1½ cups of cheesecake batter. Pour or spoon portions into pan, and then use a knife to swirl into regular cheesecake batter.

4. For pumpkin pie filling: Whisk together the sugar, salt, and spices. Add the pumpkin, evaporated milk, and eggs, and whisk gently until smooth. Carefully spoon on top of cheesecake layer.

5. Bake at 425° F for about 15 minutes. Then reduce heat to 350° F and bake for 45 minutes. If not yet done, reduce heat to 300° F ad continue baking until the center just barely wiggles.

6. Let cool before unmolding. Decorate as desired! Adding pie crumbs provides more texture and also reinforces the pumpkin pie flavor profile.


0 comment

Corn Cherry Scones – The Bay Area Co-Op Staple

| For Friends & Family, Recipe

CornCherryScone007

I was introduced to corn cherry scones at the Arizmendi cooperative bakery in Oakland, and vowed to learn how to make them. Fortunately, I learned that this scone is quite the popular one at Bay Area co-ops, and blogger Nicholas Day has already done the legwork to adapt a recipe from The Cheese Board in Berkeley. It is my duty to now share this wonderful pastry with you!

NOTE: This is not your normal scone recipe. You will not be able to form a flat circle and cut into wedges. This dough spreads and flattens as it bakes, so you will need to form round balls. I learned this the hard way!

CornCherryScone004

Corn Cherry Scones
Makes 14 small round scones

  • 250g (2 cups) all-purpose flour
  • ½ teaspoon baking soda
  • 1 tablespoon baking powder
  • ½ teaspoon kosher salt
  • 133g (⅔ cup) sugar
  • 195g (1½ cups) cornmeal (medium or fine grind — I use about a 40:60 (medium:fine) ratio)
  • 227g (1 cup or 2 sticks) cold unsalted butter, cut into 1-inch pieces
  • ¾ cup dried sweet cherries (tart works too)
  • 1 cup buttermilk (higher the fat the better)
  • Sanding sugar

1. Heat the oven to 425° F (this works better for a convection oven — if you don’t have one, heat to 375° F). Line 2 baking sheets with parchment paper.

2. In a large bowl, sift together the flour, baking soda, and baking powder. Add the salt, sugar, and cornmeal and mix together.

3. With a pastry cutter or a couple of butter knives, cut the butter into the flour mixture until it is the size of peas. Mix in the cherries, and then make a well in the center and pour in the buttermilk. Mix briefly, just until the dough comes together; it should be stiff and still a little sticky. Let rest for 5 minutes.

4. Form the dough into balls about 2 inches in diameter and place them on the baking sheets a couple of inches apart. Brush with buttermilk, milk or cream and sprinkle generously with sanding sugar. Place in the oven and immediately turn down the temperature to 375° F (or keep at 375° F if that is what you pre-heated to). Bake for 20 to 25 minutes, rotating the sheets halfway through, until the scones are golden. Cool on a wire rack.

CornCherryScone009

0 comment

Holiday Shortbread Cookies

| Holidays, Recipe

IMG_3338

We’re back from a brief hiatus over the Christmas holidays! I wish I could describe wonderful travels and adventures, but mostly I was just fighting cold after cold. However, I did get around to making some holiday iced shortbread cookies, both during and after the holidays, because there’s never a bad time for a little butter+sugar cheer. I used to always call these sugar cookies, but it turns out they don’t actually have to be (and might not be) sugar cookies. A shortbread cookie will last longer and has a great buttery taste to complement the sugary royal icing decoration. To make these snowflake cookies, I used the following shortbread cookie recipe, and then dipped the cookies in flood consistency royal icing before dipping in sprinkles and piping a pattern with medium royal icing.

Shortbread Cookies

  • 454g (2 cups or 4 sticks) unsalted butter, room temperature
  • 1 tablespoon vanilla extract
  • 170 g (1½ cups) powdered sugar
  • ½ teaspoon salt
  • 510 g (3¾ cups) all-purpose flour

1. Beat the butter, vanilla, salt and powdered sugar in a standing mixer with the paddle attachment on low just until homogenous and creamy. Do not aerate. Scrape down bowl.

2. Add the flour all at once and beat on the lowest speed just until the dough comes together. Wrap the dough in plastic wrap and refrigerate until firm.

3. Briefly work the dough with your hand to make it pliable then roll out to a thickness of ¼ inch (⅜ inch for larger cookies, like the snowflakes). Cut out shapes as desired and place on a parchment lined baking sheet. I used R&M snowflake cutters.

4. Bake cookies at 375° F for about 15-20 minutes until golden. Cool completely on the pan and then store airtight.

IMG_3326 IMG_3328

With other shapes and royal icing colors, you can really get creative:

IMG_0385-001

0 comment

1 2 3 4