Holidays

Holiday Shortbread Cookies

| Holidays, Recipe

IMG_3338

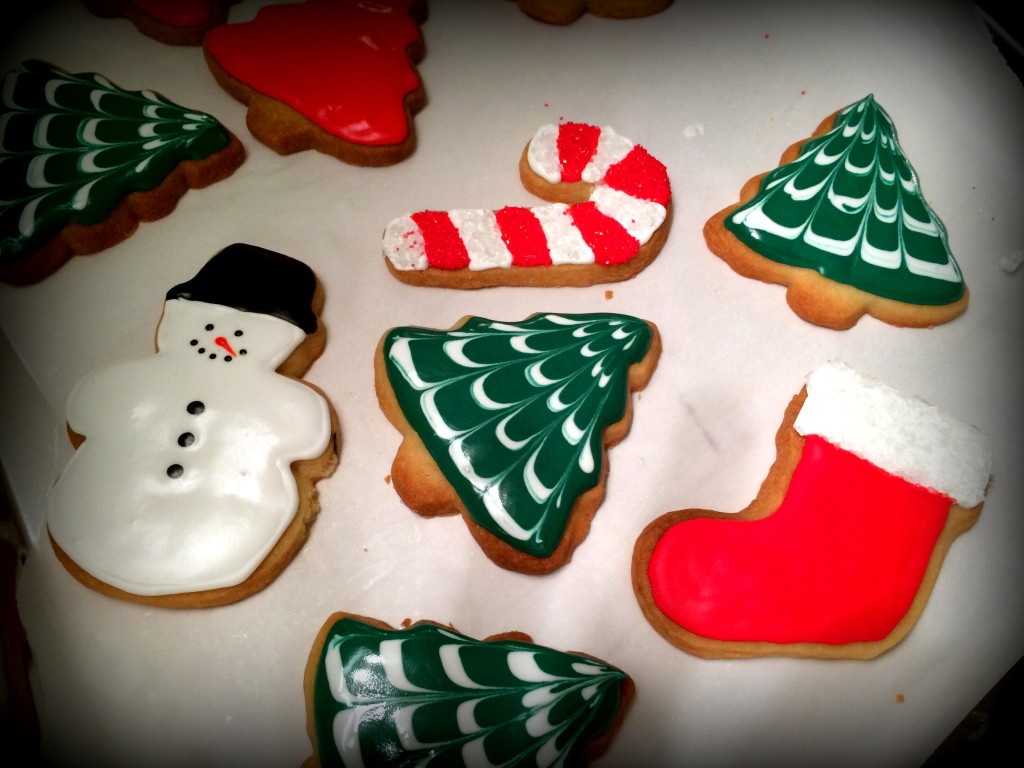
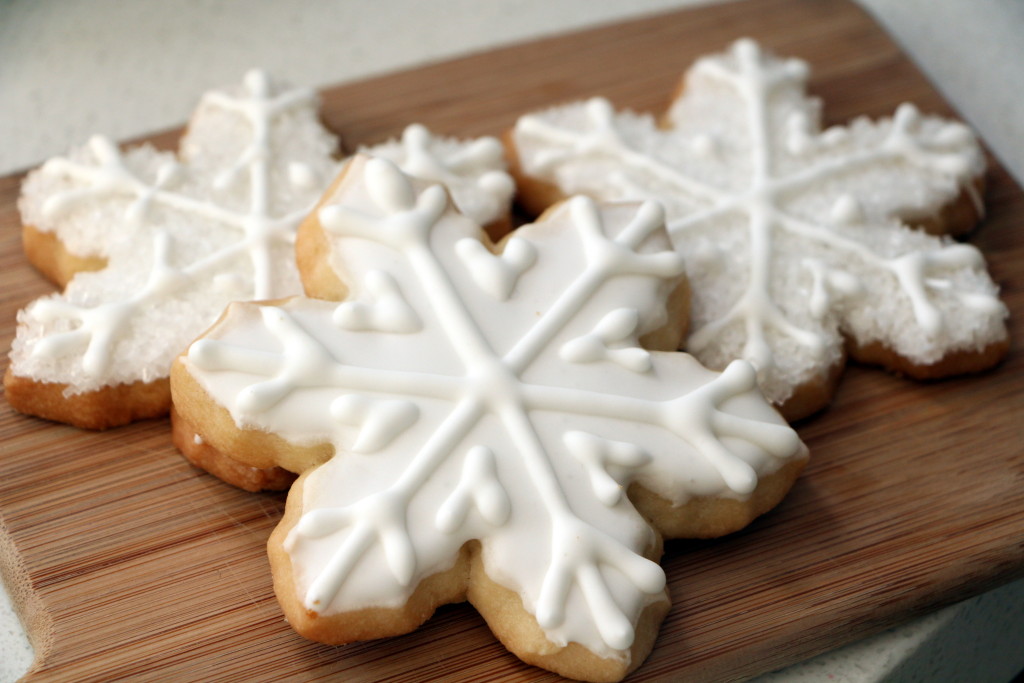
We’re back from a brief hiatus over the Christmas holidays! I wish I could describe wonderful travels and adventures, but mostly I was just fighting cold after cold. However, I did get around to making some holiday iced shortbread cookies, both during and after the holidays, because there’s never a bad time for a little butter+sugar cheer. I used to always call these sugar cookies, but it turns out they don’t actually have to be (and might not be) sugar cookies. A shortbread cookie will last longer and has a great buttery taste to complement the sugary royal icing decoration. To make these snowflake cookies, I used the following shortbread cookie recipe, and then dipped the cookies in flood consistency royal icing before dipping in sprinkles and piping a pattern with medium royal icing.

Shortbread Cookies

  • 454g (2 cups or 4 sticks) unsalted butter, room temperature
  • 1 tablespoon vanilla extract
  • 170 g (1½ cups) powdered sugar
  • ½ teaspoon salt
  • 510 g (3¾ cups) all-purpose flour

1. Beat the butter, vanilla, salt and powdered sugar in a standing mixer with the paddle attachment on low just until homogenous and creamy. Do not aerate. Scrape down bowl.

2. Add the flour all at once and beat on the lowest speed just until the dough comes together. Wrap the dough in plastic wrap and refrigerate until firm.

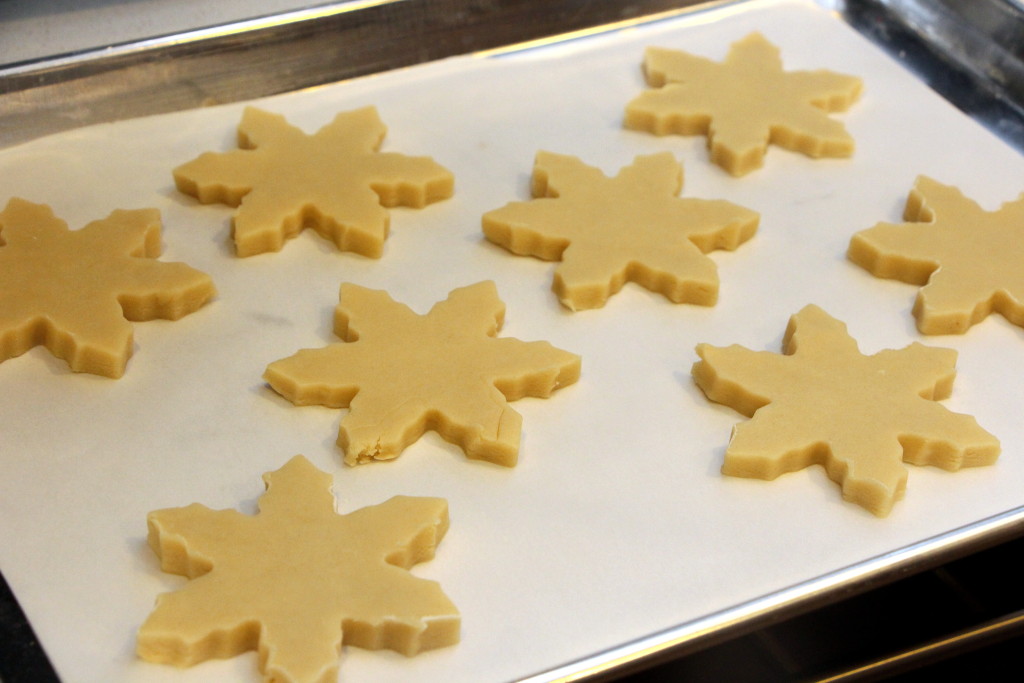
3. Briefly work the dough with your hand to make it pliable then roll out to a thickness of ¼ inch (⅜ inch for larger cookies, like the snowflakes). Cut out shapes as desired and place on a parchment lined baking sheet. I used R&M snowflake cutters.

4. Bake cookies at 375° F for about 15-20 minutes until golden. Cool completely on the pan and then store airtight.

IMG_3326 IMG_3328

With other shapes and royal icing colors, you can really get creative:

IMG_0385-001

0 comment

Thanksgiving | (Part 2) Ultimate Chocolate Viking Cake

| Holidays

IMG_3276

For Thanksgiving this year, I got a request for a chocolate dessert. So I took the opportunity to make one of my favorite very very chocolatey desserts, the Viking cake from Extraordinary Desserts. This is a 3-layer chocolate sour cream cake, with a dark chocolate creme brulee filling, as well as a milk chocolate chantilly cream filling. The cake is also brushed with cocoa simple syrup and lined with ganache.

IMG_3245

Finally, the cake is covered with the ganache and crushed cocoa almond praline. For decoration, I dusted the top of the cake with powdered sugar and made some marzipan autumn leaves and acorns.

IMG_3250

IMG_3274

This is best consumed in thin slices to avoid chocolate overdose 🙂

IMG_3284

IMG_3288

0 comment

Thanksgiving | (Part 1) Pumpkin Brown Butter Cupcakes

| Holidays, Recipe

IMG_3236

Martha Stewart’s pumpkin sage brown butter cupcakes are a seasonal favorite of mine, especially when paired with brown butter icing. This year, I made a batch of mini cupcakes for the workplace, saving of course a healthy tupperware full of them to snack on at home! Here is the recipe, with a few tips:

Pumpkin (Sage) Brown Butter Cupcakes
Makes 12 regular cupcakes, or about 30-32 mini cupcakes.

  • 170g (¾ cup or 1 ½ sticks) unsalted butter
  • 210g (1 ⅔ cups) all-purpose flour
  • ¼ cup fresh sage (chiffonade)
  • 2 teaspoons baking powder
  • ½ teaspoon ground cinnamon
  • ¼ teaspoon freshly grated nutmeg
  • ⅛ teaspoon ground cloves
  • 1 teaspoon salt
  • 1 cup pumpkin puree
  • 220g (1 cup) packed light brown sugar
  • 2 large eggs
  • Brown Butter Icing (recipe follows)

1. Preheat oven to 325 F. Line muffin tins with paper liners, or brush with butter and dust with flour.

2. In a saucepan, melt the butter over medium-low heat. Add the sage, if desired, and continue to cook, swirling occasionally, until butter turns golden brown. Skim foam from top, and remove from heat. Pour into a bowl to stop the cooking, leaving any burned sediment behind; let cool.

3. Whisk together flour, baking powder, salt, cinnamon, nutmeg, and cloves. In another bowl, whisk together the pumpkin puree, both sugars, eggs, and brown-butter mixture. Add flour mixture and whisk until just combined.

4. Divide batter evenly among lined cups, filling each three-quarters full. Bake, rotating tins halfway through, until cake tester inserted in center comes out clean, about 20 minutes for standard cupcakes and 10-12 minutes for mini cupcakes. Transfer tins to wire racks to cool completely before removing cupcakes. Cupcakes can be stored overnight at room temperature, or frozen up to 2 months, in airtight containers.

5. To finish, dip top of each cupcake in icing, then turn over quickly and let set. I prefer to use a smaller bowl with a deeper pool of icing. If icing separates or does not smoothly coat the cupcake (e.g. icing has trouble sticking to cake), add a little more milk to the icing and mix well. Decorate as desired — I added some white chocolate curls this time. Cupcakes are best eaten the day they are glazed, keep at room temperature until ready to serve.

IMG_3231

IMG_3239

Brown Butter Icing
Makes 1 cup

  • 113.5g (½ cup or 1 stick) unsalted butter
  • 250g (2 cups) sifted confectioners’ sugar
  • 2 teaspoons pure vanilla extract
  • 2 tablespoons whole milk, plus more if needed

1. Melt butter in a small saucepan over medium heat, swirling pan occasionally, until nut-brown in color, about 10 minutes. Remove from heat, and pour butter into bowl, leaving behind any burned sediment.

2. Add confectioners’ sugar, vanilla, and 2 tablespoons milk to brown butter, stir until smooth. If necessary, add more milk (up to 2 tablespoons) a little at a time, until the icing is the right consistency. Use immediately.

IMG_3232

0 comment

1 2 3 4 5